There is already quite a nice MOD on the phpBB forums called Social Networking Site Buttons (athough this now seems to have been abandoned). I was interested in getting a similar functionality, but I didn't want to go through all the hassle of installing that huge MOD. That's when I got the idea of using Custom Profile Fields - it's already built in into phpBB, just needs a few tweaks.
It would be nice if phpBB could allow links/images in custom profile fields by default, but we can't have everything I know. Maybe in 3.1 or 3.2 we might see a more updated functionality. For now, you can follow this tutorial to achieve the results I have. This tutorial is designed for board owners who are using prosilver or a prosilver based style. There is no code here for subSilver2 based styles, but it shouldn't be too hard to work it out yourself.
First off, you want to make sure you are using the latest version of phpBB. At the time or writing this tutorial, it was 3.0.6, which is perfect as CPF's have been redesigned to allow them to be shown in different areas a lot easier. Now you set up the fields that you want to add. In this tutorial, I will use twitter - you can exchange this for any other SN Site.
New CPF's can be added via your ACP (Admin Control Panel) -> Users & Groups Tab -> Custom Profile Fields. Create a new single text field and call it "twitter" (w/o quotes). Set "Publicly display profile field:" to yes and tick "Display in user control panel:" and "Display on viewtopic screen:". It's up to you if you want to tick any of the other options, they are not necessary but you may want to include them. It should look a bit like this so far:
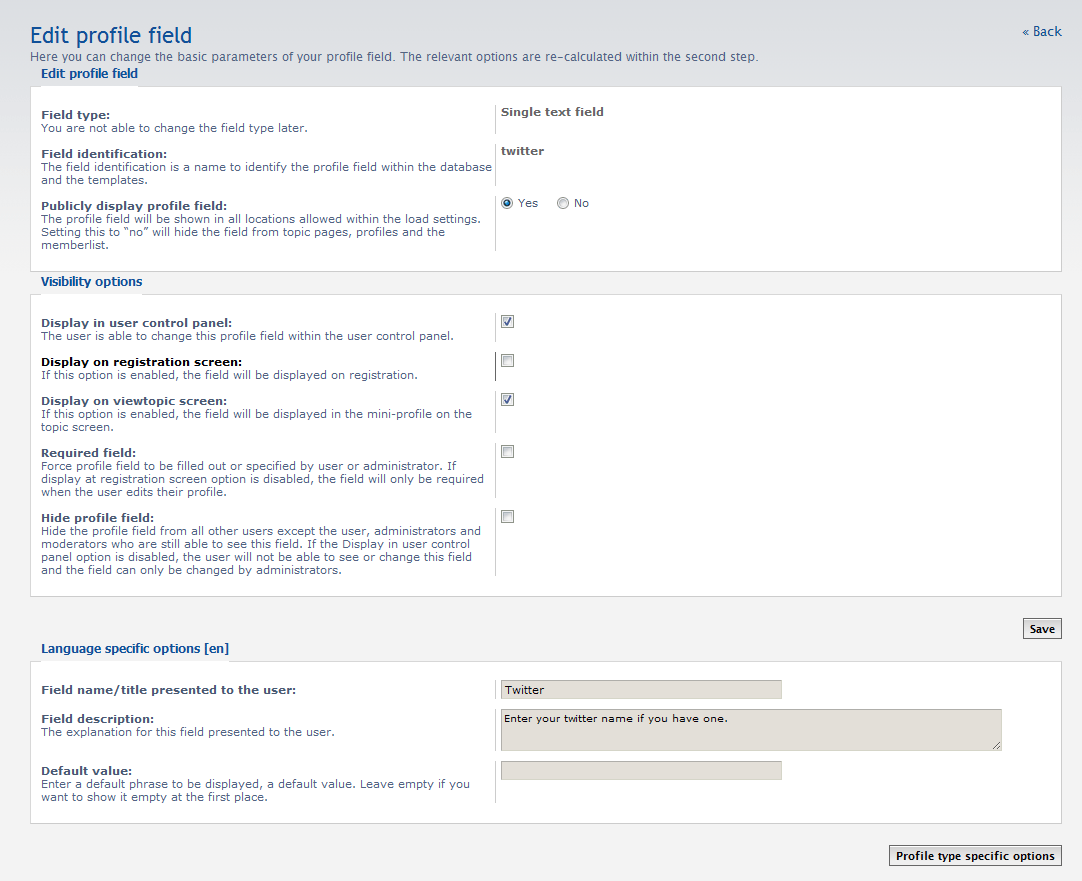
The input boxes at the very bottom, as what will be shown to the user on the profile page when they go to enter in their details. Keep a note of the field name, we'll need this a little later on.
For the profile specific options, I set the length of the input box to 20 and the max characters at 30. Again, feel free to modify these to your liking. Min characters is set at 0. Field validation should probably be set to Alphanumeric and spacers (although twitter only allows underscores as a spacer). Ok, now we have out field set up, go to your profile and type in your twitter username and save. Check your profile page and viewtopic and make sure that it shows up properly.
Now, it's time to start messing with the code. We'll start off with the profile page, as it's the easier of the 2.
#
#-----[ OPEN ]------------------------------------------
#
styles/YOUR_STYLE/template/memberlist_view.html
#
#-----[ FIND ]------------------------------------------
#
<!-- BEGIN custom_fields --><dt>{custom_fields.PROFILE_FIELD_NAME}:</dt> <dd>{custom_fields.PROFILE_FIELD_VALUE}</dd><!-- END custom_fields -->
#
#-----[ REPLACE WITH ]------------------------------------------
#
Essentially we're just hiding this information. You can delete it if you like, just remember to take a back up of your file beforehand. The reason we do this, is so that we don't end up with duplicate fields showing on the page, you'll understand in a minute ;) The downside of doing this, is that it will affect all other custom profile fields.
<!-- BE-GIN custom_fields <dt>{custom_fields.PROFILE_FIELD_NAME}:</dt> <dd>{custom_fields.PROFILE_FIELD_VALUE}</dd> EN-D custom_fields -->
#
#-----[ FIND ]------------------------------------------
#
<!-- IF postrow.U_JABBER --><li class="jabber-icon"><a href="{postrow.U_JABBER}" onclick="popup(this.href, 550, 320); return false;" title="{L_JABBER}"><span>{L_JABBER}</span></a></li><!-- ENDIF -->
#
#-----[ AFTER ADD ]------------------------------------------
#
                   <!-- BEGIN custom_fields -->
                            <!-- IF postrow.custom_fields.PROFILE_FIELD_NAME eq "Twitter" --><li class="twitter-icon"><a href="http://twitter.com/{postrow.custom_fields.PROFILE_FIELD_VALUE}" title="{L_TWITTER}"><span>{L_TWITTER}</span></a></li><!-- ENDIF -->
                     <!-- END custom_fields -->
Notice this part:
<!-- IF postrow.custom_fields.PROFILE_FIELD_NAME eq "Twitter" -->
Make sure and replace Twitter with what ever you called the field - remember from earlier? If you can't remember, just pop back to the ACP and take a look. If it has spaces, remember to include these as well. Now save and upload that file, clear your cache and check your profile page. If all went well, you should now have a link to your twitter page in the Contact area of that page.
On to viewtopic - here we are going to start by doing something similar to what we did with the profile.
#
#-----[ OPEN ]------------------------------------------
#
styles/YOUR_STYLE/template/viewtopic_body.html
#
#-----[ FIND ]------------------------------------------
#
          <!-- BEGIN custom_fields -->
             <dd><strong>{postrow.custom_fields.PROFILE_FIELD_NAME}:</strong> {postrow.custom_fields.PROFILE_FIELD_VALUE}</dd>
          <!-- END custom_fields -->
#
#-----[ REPLACE WITH ]------------------------------------------
#
Again, like before, you can delete this or comment it out
          <!-- BEG-IN custom_fields
             <dd><strong>{postrow.custom_fields.PROFILE_FIELD_NAME}:</strong> {postrow.custom_fields.PROFILE_FIELD_VALUE}</dd>
           E-ND custom_fields -->
#
#-----[ FIND ]------------------------------------------
#
<!-- IF postrow.U_JABBER --><li class="jabber-icon"><a href="{postrow.U_JABBER}" onclick="popup(this.href, 550, 320); return false;" title="{L_JABBER}"><span>{L_JABBER}</span></a></li><!-- ENDIF -->
#
#-----[ AFTER ADD ]------------------------------------------
#
                   <!-- BEGIN custom_fields -->
                            <!-- IF postrow.custom_fields.PROFILE_FIELD_NAME eq "Twitter" --><li class="twitter-icon"><a href="http://twitter.com/{postrow.custom_fields.PROFILE_FIELD_VALUE}" title="{L_TWITTER}"><span>{L_TWITTER}</span></a></li><!-- ENDIF -->
                     <!-- END custom_fields -->
If you would rather not bother with adding a new language variable, you can replace {L_TWITTER} with Twitter.
Now, we need some shiny buttons to display on the page. I had a couple created for me, I made some myself and I also used some from the SNB Site MOD. If you do use images from that MOD, I would suggest adding a note somewhere - just out of courtesy. Once you have you image, it needs to be uploaded to styles/YOUR_STYLE/imageset/.
You will need to update the imageset file and tell it that there is a new image:
#
#-----[ OPEN ]------------------------------------------
#
styles/YOUR_STYLE/imageset/imageset.cfg
#
#-----[ FIND ]------------------------------------------
#
img_icon_contact_jabber = icon_contact_jabber.gif*20*20
#
#-----[ AFTER ADD ]------------------------------------------
#
img_icon_contact_twit = icon_contact_twit.gif*20*20
Next, we create the CSS to allow the image to show on the page.
#
#-----[ OPEN ]------------------------------------------
#
styles/YOUR_STYLE/theme/buttons.css
#
#-----[ FIND ]------------------------------------------
#
.web-icon, .web-icon a { background: none top left no-repeat; }
#
#-----[ AFTER ADD ]------------------------------------------
#
.twitter-icon, .twitter-icon a { background: none top left no-repeat; }
#
#-----[ FIND ]------------------------------------------
#
.twitter-icon, .twitter-icon a { background: none top left no-repeat; }
#
#-----[ AFTER ADD ]------------------------------------------
#
ul.profile-icons li.twitter-icon { width: {IMG_ICON_CONTACT_TWIT_WIDTH}px; height: {IMG_ICON_CONTACT_TWIT_HEIGHT}px; }
#
#-----[ OPEN ]------------------------------------------
#
styles/YOUR_STYLE/theme/colours.css
#
#-----[ FIND ]------------------------------------------
#
.web-icon, .web-icon a { background-image: url("{IMG_ICON_CONTACT_WWW_SRC}"); }
#
#-----[ AFTER ADD ]------------------------------------------
#
.twitter-icon, .twitter-icon a { background-image: url("{IMG_ICON_CONTACT_TWIT_SRC}"); }
Lastly, we update the acp styles files
#
#-----[ OPEN ]------------------------------------------
#
includes/acp/acp_styles.php
#
#-----[ FIND ]------------------------------------------
#
                'buttons'    => array(
                    'icon_back_top',
#
#-----[ IN-LINE FIND ]------------------------------------------
#
'icon_contact_www',
#
#-----[ IN-LINE AFTER, ADD ]------------------------------------------
#
'IMG_ICON_CONTACT_WWW' => 'Website',
#
#-----[ OPEN ]------------------------------------------
#
language/en/acp/style.php
#
#-----[ FIND ]------------------------------------------
#
'IMG_ICON_CONTACT_WWW' => 'Website',
#
#-----[ AFTER ADD ]------------------------------------------
#
'IMG_ICON_CONTACT_TWIT' => 'Twitter',
#
#-----[ FIND ]------------------------------------------
#
That's pretty much it. Make sure to now refresh your theme and imageset and purge the cache. Now go to viewtopic and marvel at your new button. You can easily repeat the process for other sites. - Facebook, Myspace, Flickr, Last.fm, etc.